|
|
|
 |
Attacking a new venue |  |
|
New Venue-assessment So you have decided to attack a new venue next season, but for the moment you know nothing about it. Where do you start? Firstly take a walk around the venue, this may the first of twenty or more before you even wet a line. Talk to any anglers fishing to see what the stocking levels are like, expected depths, snaggy areas, contours, weed beds etc etc. By doing this initial recce you are building a mental picture of the venue and gaining a head start on the work you are about to start. Having done this first trip around the venue go home and start to write up what you have learned, draw a rough sketch of the venue marking any areas of interest that where pointed out to you by others or seen by yourself. Now phone or visit the tackle shop local to the venue and see if any information can be gleaned from them. Next thing to do is approach the owners of the fishing rights and ask politely if you can investigate the venue with rod and line (plumbing rod). Unfortunately these days permission is less likely to be granted so you may need to buy a license to do this work, however you may be pleasantly surprised and be granted access to do this exploratory work. |
|
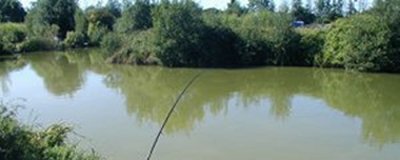
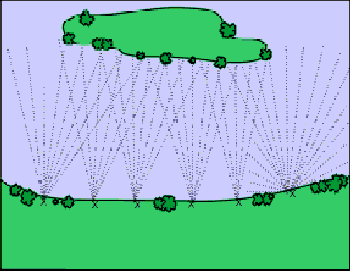
 Okay, so here is a pic of a Stillwater, so what next? This venue is surrounded by vegetation so we can use this to our advantage by climbing the trees we can peer into the depths of this water, providing that is that the water itself is clear enough to peer into. Doing this and using binoculars, Polaroid sunglasses and notebook and pen we can see weed beds and other bottom contours. You can even spot patrolling/feeding fish. Also from a tree you will get a better sense of the shape of the venue for mapping purposes. Next comes the real time consuming bit, plumbing the depth of the entire venue!! There are no shortcuts here I'm afraid, and even if you found one, chances are that this will leave you fishing in an area not completely mapped out and therefore probably in the wrong swim. For plumbing I use the following. Avon type rod, fixed spool reel loaded with 8lb test line. A swivel is threaded onto the line and then a highly visible self-cocking float is tied to the end of it. A 2oz lead is put on the swivel and you are ready to plumb. Cast out to the desired area and allow the tackle to sink, now carefully reel the float so it is tight to the lead. Open the bale arm of your reel and foot by foot release line until you can see the float break the surface, now you have the depth of that spot. Be cautious of releasing line over distances of 30-40 yards, by this I mean give the float time to take up the slack you have just given it, otherwise inaccurate reading can be gained from this. Now we have the depth for this spot, reel the float down to the lead again and reel in a couple of feet ( bringing the tackle closer to you ) and again release the line foot by foot to gain the depth for that spot. As you reel in between different spots, hold the line loosely in your other hand, you will get "sensations" through your fingers that will help you determine the make-up of the bed of the lake. So you are not only plumbing the depth but determining where weed beds, gravel bars or silty areas are. Talking of silty areas, if you come accross a swim where the weight sinks into silt and you can't gain a true reading of depth, switch to a ligther weight and/or line as necessary to achieve the readings that you require. |
|
 The diagram above shows the method of fanwise casting required for accurate plumbing of a venue, take note here of the bit to the extreme right where all of the "short" areas have been covered also. This fanwise casting will give your measurements that will cross reference with ones previously taken which in the end will give you a foolproof way of noting the bottom contours. By the time you have achieved all of this, you should have a map of the venue concerning the make-up of the lake bed, what that consists of, the depths, and where any "obstacles" are. You can now move on to the next stage in cracking this venue. |
|
|
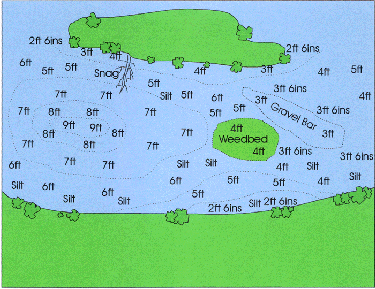
New Venue-mapping Having assessed the venues potential and plumbed to find the relevant depths, snags, silt/gravel, and weed beds. We now have a better idea of the contours of the lake, and can draw a "map" like below. |
|
 This is the "map" from the previous article, in that one the only obvious features where the island and the near bank margins. As can be seen here, careful plumbing of the depth has revealed a multitude of oppurtunities for the angler. There are approx 50 depth markings here, this does not represent the true number of readings, which for an area of 100yds bank and 50yds to the island, would be about 4-500 in total.But with between 5-10 readings per cast, you can soon achieve this result. Okay, I can appreciate that this may seem excessive to some as you can just turn up on the day, pick a swim, plumb and fish it. But your chosen swim could be right next door to an obvious hotspot that until the whole area has been investigated, you will not be aware of. So where do we go from here? This is where watercraft comes into its own, your knowledge of fish habits and the requirements of the species that you seek. There is no quick way to gain watercraft, indeed even the very elite anglers are still adding to this, every time they go fishing and if I ever stop learning, I'll stop fishing! Fish do not have eyelids, and need cover from the sun in the daytime so expect to find them under the cover of trees, in snags and weedbeds. In days of low light conditions, they could be anywhere as they could also be at night. So how do we concentrate fish into an area where we can catch them? We prebait.. |
|
|
Prebaiting Prebaiting allows the fish time to become comfortable with your chosen bait, attracts or concentrates fish in an area chosen by the angler and will make the quest for certain individual fish/species, that bit easier. I say easier, but in retrospect this is not necessarily so. Prebaiting means hard work, there are no shortcuts but the results will outweigh this labor if you are successful. It can take on many forms, short or long term, mass or accurate bait placement. Particles, boilies or "natural" baits can be used, as can groundbait or other cereal type baits. This will depend on your intended quarry. I use mainly particles in my approach but occasionally use a cereal type bait. To this I will gradually add samples of hookbait (whatever that may be), but in the main, the cheaper particles are what gives the fish the "free lunch" so to speak, and so gives them the confidence to feed with abandon. Three of the particles that I use are , Maize, hemp and a special mixture called Parti-blend. In the main a soaking period is necessary, followed by cooking, cooling and then freezing so you have a supply ready to go that just needs defrosting. Another favourite pre-bait (and hookbait) particle is wheat. This is very cheap by the sackful and requires soaking and cooking. In years gone by it was extensively used for species such as Roach, and with great success. I have had in recent years very good Roach catches after pre-baiting with wheat and Hemp and caught Roach to 1lb 14oz when used as a hookbait. |
|
|
|